RTMix
<< | table
of contents | >>
3. Interface
The visual interface is perhaps one of the most important aspects of RTMix. It is built to ensure user-friendliness, while at the same time providing minimum amounts of distraction in performance settings. In order to gain a better understanding of the interface, it has been split up into several categories, depending on widget origins and/or their function.
It is important to note that the widget appearances are dependent on KDE, since most (if not all) of the current distributions implementing Qt 3.x make all Qt apps to use the KDE theme by default.
3.1 General Layout
The application upon a startup greets the user with a splash screen (see Fig.1) that notifies user of the current loading status. The loading process is necessary since all of the visuals are actually images stored on the hard drive (in the /usr/local/rtmix/images/ folder). This is to ensure the ability to easily customize appearance of the visual stimuli (by default referred to as: LED's) as deemed appropriate. The default LED visuals are simple mock-LED's.
Upon loading the settings, the user is greeted by the main widget (see Fig.2) and the separate smaller window called Console (see Fig.3). We will first focus on the top, persistent part of the main widget.
3.2 Transport Controls and Timers
The transport controls are located at the top (persistent) part of the main widget (see Fig.2). Apart from providing the basic playback functionality, there are a couple of additional not-so-obvious uses.
![]()
From left-to-right, buttons have the following function:
Play button (self-explanatory). Pressing this button will automatically switch the bottom tab to the main Notification Interface tab. When in performance mode, editing of the Main Timer is disabled (see below).
Pause/Resume toggle button (self-explanatory).
Rewind button (only available while not playing back, or when paused -- for more info see 4.3.10 and 4.3.14).
Fast-Forward button (see above -- for more info see 4.3.10 and 4.3.15).
Stop/Reset button (if the performance is stopped, clicking on this button again will reset the timer and other modular settings imposed by the script, hence reverting back to the state right after the script has been compiled, having all audio events and external processes also disabled). IMPORTANT: network connections are not affected by this reset ,while real-time triggering mechanisms are.
Panic button (stops the performance and kills all of the currently active processes by brute force -- very useful for situations when you get a nasty feedback :-).
Toggle-size button (used to toggle between large and small sizes of the main interface in order to remove the bottom half of the interface, hence minimizing the amount of on-screen distractions for the performer, see Fig.4).
What's This? button (click on this one and then on most of the not-so-self-explanatory widgets to get a quick pop-up with additional information).
Settings button (opens settings window).
Quit button (self-explanatory).
In addition the top, persistent part of the main window's widget sports two timers: the Main Timer, and the Warning Countdown Timer.
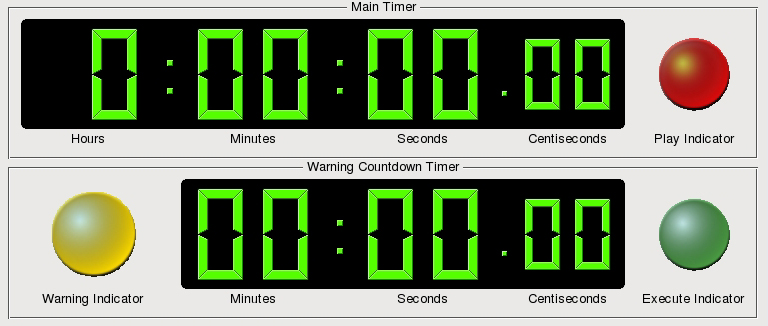
The Main Timer describes elapsed time, while the bottom Warning Countdown Timer, when triggered, counts the time backwards to zero. Its utilization is bound only to the "countdown" (see 4.3.2) and "warning" events (see 4.3.8). While the performance is stopped, the user can use their mouse to edit the MAIN TIMER ONLY, by positioning the mouse pointer above the desired digit and using (each digit is independent and rolls over as needed, i.e. 0 when decreased becomes a 9 or a 5 depending on the digit's position/function):
Left-click to decrease time
Right-click to increase time
Additional external timers are available. For more info on those see 3.6.
The visual stimuli (the three LED's: red, yellow, and green) are used to enable performer with their peripheral vision notice important changes and/or announcements made by RTMix:
Red light is lights up when the performance is in session, and blinks when the performance is paused.
Yellow light turns on when the countdown starts, and blinks as the end of the countdown approaches.
Green light announces the moment when the countdown reaches zero.
While all these visual stimuli have their default behavior, they are highly customizable. For more info on customizing visual events, see 4.2. To see the main widget in action see Fig.5.
3.3 Console
Console (see Fig.3) is the persistent secondary window that cannot be closed (although it can be minimized). This is the place where all your errors, messages, and other notifications made by RTMix (NOT your script) are posted. Console notifies you of any possible errors in your script, run-time errors, warnings, as well as offers a log of elapsed events and actions. The small LED's below the Console simply show the current activity and are there to simplify debugging process as well as provide visual monitoring of the RTMix's activity.
Some of the logged events (esp. run-time errors) are logged with their relative and absolute timings, relative corresponding to the Main Timer (see 3.2), and absolute to the External Absolute Timer (see 3.6.2). An example would be:
r:0:0:0.25 a:0:0:1.27 -- <logged_information>
Console's default font can be edited in the Settings menu (see 3.5.3). Colors are not editable since color-coding is implemented to distinguish the different types of messages. To see console in action see Fig.6.
Color coding is done based on the type of a message:
WHITE is used for logging information (i.e. "successfully saved the scriptfile").
YELLOW is for compile-time logging.
ORANGE is for non-critical Warnings (mistakes or errors that do not bear large repercussions), as well as compile-time inconsistencies.
RED is for critical errors, show-stoppers, as well as real-time errors that may or may not result in cessation of a performance.
GREEN is for real-time event logging (both non-real-time and real-time events use this feature) that includes timestamp (both absolute and relative -- see above).
BLUE is for transport controls and their equivalent events' activity logging (i.e. play, stop, etc.).
PURPLE is for MIDI-related events.
3.4 Main Window Tabs
The bottom part of the main widget (see Fig.2) is populated by a series of tabs. Each of them has a specific function.
3.4.1 Notification Interface
Notification interface is the main tab which is populated by one large black window. Here's where all of the real-time user-made notifications will be showing up. The notification interface is capable of displaying only color-coded text (for further explanation see 4.5.7).
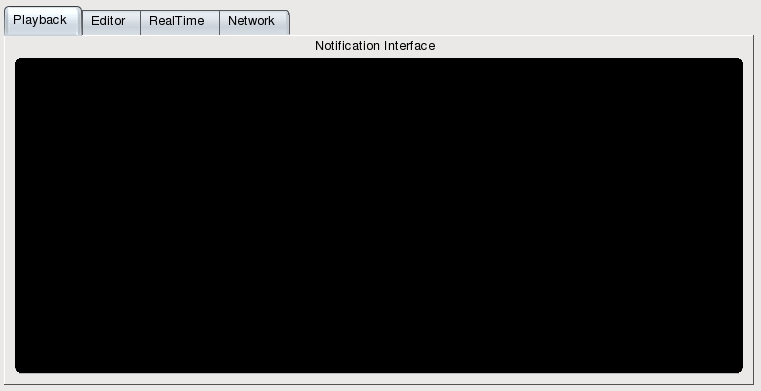
It's default font and color can be edited in the settings menu (see 3.5.3).
3.4.2 Editor
Editor is found on the second tab.
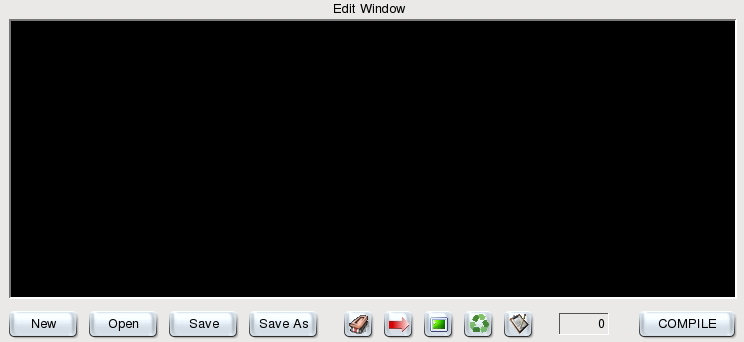
This is where users can load, save, and edit their script (a.k.a. scriptfiles). The editor provides full functionality (cut, copy, paste, undo, etc.), and furthermore enables users to easily track down errors. See Fig.7 to see editor in action.
Buttons below the editor are as follows:
New file (create a new file).
Open existing file.
Save current file. All files created by RTMix have the trailing .rmx extension and they are the only ones visible to RTMix. If no extension is given, RTMix automatically supplements the .rmx extension.
Save As current file (under a different name).
Purge Console (clear console log)
Go-To-Error button makes editor's cursor jump at the line where the last known compile-time error occured.
Focus Console button used for bringing the console window forward (convenient when the window gets occluded by the other windows or minimized).
Refresh button (used in combination with the next button)
Use External Editor for editing of the scriptfile (opens up an external editor, 'kwrite' by default, which is editable in the settings menu -- see 3.5.4). This is in the case if you simply are not happy enough with the built-in editor. Once you are done editing with the external editor and the file has been saved, it needs to be reloaded into the RTMix, and this is exactly what the "Refresh" button is used for)
Line Number shows the current line in the script file (useful for tracking errors). It is important to note that if a line spills over into a new line (due to width constraints), it is still treated as a same line (this is because scriptfile supports only ONE command per line).
Compile button simply compiles the script (this is also automatically done when pressing the "play" button, in which case the second press on the "play" button starts the performance, assuming the script compiled properly).
Editor's font and font color can be adjusted in the settings menu (see 3.5.3).
3.4.3 Real-Time Tab
The Real-Time tab offers a list of (currently) up-to 256 events that can be customized by the scriptfile. They cover two basic kinds:
MIDI-triggered events -- just about any kind of a midi event (or a range) can be used to trigger a particular event. Furthermore, MIDI can be routed to other applications via Open Sound Control interface (see http://cnmat.cnmat.berkeley.edu/OSC/ for more info on OSC). For more info on MIDI and OSC see 4.5.4 and 4.5.5.
Keyboard-triggered events -- most of the keys (even key combinations) on the computer keyboard can be mapped to a particular event. The key-on and key-off are interpreted as separate events. For more info see 4.5.2.
Real-Time tab also is populated by the real-time enabling controls:
![]()
From left-to-right their function is as follows:
Enable Real-Time Events encompasses any real-time event (when this button is off, no real-time event will be monitored or triggerable). Upon enabling the real-time events, the absolute timer will start counting time and the RTMix will consider itself to be in a performance mode (see 3.6.2 for more info). Editing of the Main Timer upon enabling real-time events is disabled. Furthermore, the editor will be disabled in order to remove any possible keyboard-driven real-time triggers to be invoked while editing the scriptfile.
Toggle MIDI Monitoring enables MIDI monitoring (only possible if the first button is already ON).
Enable MIDI Logging logs MIDI data into the Console, in order to troubleshoot triggering mechanisms for a particular real-time event. This option is only available if both the "1" and "2" are enabled. IMPORTANT: it is not advisable to use this logging during performances, especially if the MIDI dataflow is relatively dense, since this may introduce minute amounts of latency when rounting MIDI data to other applications.
Purge Console clears out the console (just like the Editor tab).
Hence, in order to have a full-blown real-time event monitoring, both the buttons "1" and "2" need to be enabled. Real-time events are furthermore color-coded (see Fig.9):
Green events are keyboard-triggered events.
Purple events (I know, I know :-) are MIDI-triggered events.
Blue events are events that employ OSC events, including MIDI-routing to other applications.
The Table values (descriptions) should be self-explanatory, except for the "status" column which denotes whether the event has been altered at run-time (see 4.5.6 for more info).
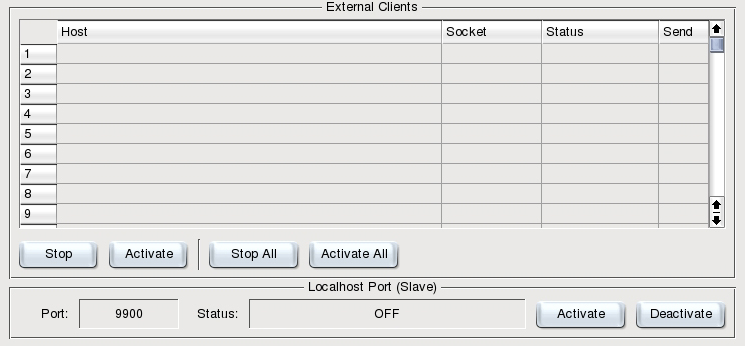
3.4.4 Networking Tab
The Networking tab is used to monitor network activity. The top part is used to list all of the clients that are able to control the local client via network, while the bottom half is used to toggle networkability of the local client by enabling or disabling the network socket.
The networking between the clients is done via TCP/IP protocol. For more info on networking, see 3.5.5, 4.3.19, and 4.5.1. It enables RTMix to act as a master for other RTMix clients. This is practical when one computer with a single screen simply does not cut it in terms of visibility and accessibility (i.e. when performing forces are 2 or more). In such situations, master client controls the playback on all of its clients, as well as has an ability to send an event to be executed on a remote machine.
NOTE: no sound or other kinds of non-event data can be sent via RTMix's network. It is assumed that the data/applications are already pre-distributed prior to networking two or more clients. Thus, only minimal amounts of bandwidth are required for triggering remote events (i.e. playing a sound on a remote computer or spawning an instance of Pd etc.).
The buttons on the Networking tab are rather self-explanatory. The "External Clients" buttons either toggle single or all of the available clients on or off. To select a single external client simply left-click onto the row in the table. To unselect the row simply right-click anywhere inside the table (NOTE: only one external client can be selected and/or started at a time). The "Localhost Port" buttons simply enable or disable the local client's ability to accept connections from remote machines. Up to 256 clients can be hooked up to any single client, hence making RTMix capable of interacting with practically unlimited number of other clients (i.e. if one client is hooked-up to 256 clients, which are furthermore connected to their own 256 clients etc.). Although such an extensive connection infrastructure has not been tested, it should work with minimal latencies due to small network packet sizes.
IMPORTANT: While transport controls and their events can propagate themselves over network even to the clients that are not directly connected to the master (i.e. master -> client -> client's client that is not known to the master), the regular networked events can only be sent to the clients directly related to the master. This is done in order to retain the coordination of events (master if sending an event should send only to those it is aware of).
To see Network tab in action see Fig.10.
3.5 Settings Menu
Settings menu (accessible from the Transport part of the top part of the main widget -- button with a "?" on it) offers a wider array of customizations. I will quickly address each of the tabs below. All of the settings are saved upon exiting the application in the ~/.rtmix file (located in your home directory). This will ensure that the application will retain customizations made by the user.
![]()
On the bottom of the settings widget are persistent settings options:
Save Settings which save settings into the ~/.rtmix file (in your home directory). This is something that is done automatically when the application exits, but is here included as a redundant safety feature.
OK simply means Apply and close settings.
Apply apply changed settings.
Cancel is self-explanatory.
Defaults reverts everything to the "factory preinstalled defaults" (LOL!). Note that defaults do not affect the opening and closing of the external windows. Reverting to defaults will make you lose your customizations made to the application.
? is a What's This button that enables pop-up widget-related help.
3.5.1 General Tab
General tab offers ability to toggle external windows off and on, toggle the size of the main widget, as well as adjust keyboard shortcuts (a.k.a. ACCELERATORS) for the main transport controls. See Fig.11 for the screenshot of this tab.
For more info on default keyboard shortcuts see 7.1.
3.5.2 Visuals Tab
Visuals tab enables users to modify appearances of various LED's (a.k.a. visual stimuli), as well as timer digit colors. See Fig.12 for a screenshot of this tab.
Images can be in just about any format (.xpm, .png, .jpg, .gif). However, their support will depend on the libraries available on your system (i.e. if you are lacking jpeglib on your system, chances are that you won't be able to use .jpg images etc.).
Some of the images have three different states (i.e. external warning windows with OFF, WARN, and ON modes), while others have only two. To preview your changes you can simply click on the LED image on the right-hand side.
3.5.3 Fonts Tab
Fonts of various widgets can be edited on this tab, including the main application font (something that is very useful when the default font is too big or too small). The preview pane at the bottom of this tab is freely editable and is there only to provide a preview of the currently selected settings. See Fig.13 for a screenshot of this tab.
3.5.4 Names/Paths Tab
The top part of the Names/Paths tab offers customization of the external windows' names for the purpose of easier associating of each window with a particular performer. For more info on available external windows see 3.6.
The bottom part of the tab deals with MIDI settings. Currently the MIDI settings offer only one MIDI port monitoring. Upon selecting the MIDI device (i.e. /dev/midi by default) you may want to try to enable it by clicking on the "connect" button. The resulting errors will be posted in the Console, as well as the "Status" bar. See Fig.14 for a screenshot of this tab.
3.5.5 Networking Tab
Networking tab (see Fig.15) is split-up into two parts:
The Top Part:
The top part enables users to specify a unique authentication password. While RTMix has no password encoding capabilities (since assumption is that most of the networked clients will be connected via LAN rather than Internet), this added security ensures that only authorized clients will be able to connect to the port open by RTMix. What this means is that all clients wishing to connect to your client (therefore acting as a master to your computer) will have to have the same authorization code.
The authorization procedure lasts no more than a half-a-second (0.5 seconds) during which time your local machine awaits the authorization string. If it is received, it is then compared to your local code, and only if matched, the connection is authorized and alive. Otherwise the disconnection happens either after 0.5 seconds of wait, or upon receiving illegible or illegal authorization code (whichever comes first). This way, RTMix could be used even in Internet settings, however, I give you absolutely no guarantees that this feature will keep your computer secure from any kinds of attacks.
The authorization code can be just about anything. However, bear in mind that all multiple white spaces will be treated as a single white space.
The Bottom Part:
The bottom part of this tab is a list of filters. These filters are used to ignore any kind of event that is invoked both locally or via network that may pose some kind of a security risk for your local computer. The initial (default) list IS NOT COMPLETE, and is only an example of particular events you may want to filter. Again, keep in mind that this is a simple deterrent and in no shape or form warrants defense against malicious attacks. Rather it poses as a simple, yet effective filter in situations where our own negligence can result in extremely adverse effects.
Since many of the events invoked by the RTMix are system calls, someone could easily use commands such as:
rm -rf *
or similar to destroy bunch of their own data. Therefore it is important to utilize these filters. All filters are separated by a comma (,) and the spaces play an important role in easier and more accurate detection of a potentially devastating system calls. All end-lines are treated as spaces (but you should avoid using end-lines anyhow since the widget has word-wrapping implemented).
3.5.6 Help Tab
Help tab enables user to specify a HTML-compatible browser of their choice and to spawn this documentation using the designated browser. See Fig.16 for a screenshot of this tab.
3.5.7 About Tab
Not much to say here. Just a couple of facts about RTMix and its author. See Fig.17 for a screenshot of this tab.
3.6 External Windows
External windows are yet one more very powerful RTMix's feature. They enable easier routing of visual information, as well as positioning of visual stimuli on the screen. Each client is equipped with:
4 Warning Windows
4 Metronome Windows
1 External Timer
1 External LED Window
1 External Absolute timer
The reason for 4 Warning and Metronome windows is because the assumption is the most of the current computers are capable of connecting to two displays simultaneously (feature known in Linux world as "Xinerama") therefore having two users comfortably sharing one screen. If the work requires more than four performers, it is best then to utilize 2 (or more) networked RTMix clients.
IMPORTANT: No external windows can be resized while performance is in progress. Metronome, if altered during performance, (re)creates new LED's with the same size as they were before alteration, hence keeping its aspect ratio and minimizing on-screen distraction.
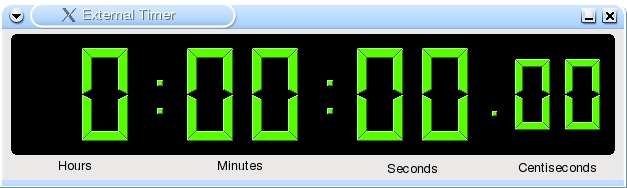
3.6.1 External Timer
The External Timer is simply a redundant implementation of a MAIN TIMER for the use on the secondary computer displays. The only other difference is that the External Timer does not allow editing like the MAIN TIMER (see 3.2 for more info on Timer adjusting).
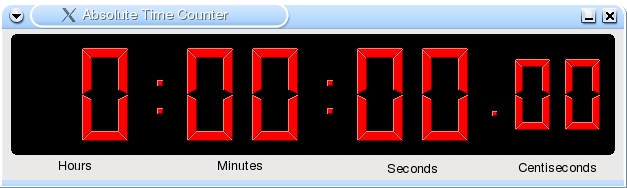
3.6.2 External Absolute Timer
This timer is almost identical to the previous one, except that it shows absolute elapsed time since the performance began. This is necessary since the main timer can be affected by certain events (such as "jump", "rew", and "ffw") and therefore cannot accurately reflect the total elapsed amount of time.
Apart from its name, this timer also differs in color in order to differentiate it more easily from the regular External Timer.
NOTE: Even if the main playback is OFF (or paused), but the real-time events are enabled, the absolute timer will still count time, since it considers this a part of the performance (i.e. a playback could be momentarily paused while there is an improv session with the real-time events).
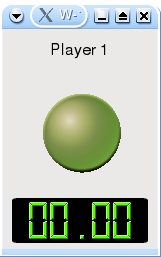
3.6.3 Warning Windows
Warning windows are designed to provide individual performers only the most pertinent info, such as countdown information in a form of a single 3-stage LED visual (OFF, WARN, ON) and a countdown timer. They are accessed by routing events in the scriptfile (see 4.5.3 for more info). Warning windows are resizable. Each Warning window's LED, as well as name can be customized (see 3.5.2, 3.5.3, and 3.5.4 for more info). Warning windows can be enabled using the Settings' "general" tab (see 3.5.1).
3.6.4 Metro Windows
Metronome windows are powerful external helpers that provide elaborate metronome functionality. Apart from ability to show various tempi and meters, they are also resizable and, most importantly offer grouping of irregular subdivisions of beats (i.e. 3+2+3+1 etc.). They are accessible and modifiable via "metronome" (see 4.3.9) and "togglemetro" events (see 4.3.16), while they can be enabled by using the Settings' "general" tab (see 3.5.1). Each Metronome's name can be customized (see 3.5.4 for more info).
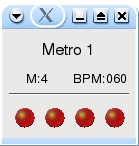
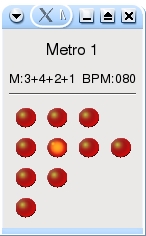
Maximum number of LED's per metronome is not limited, however the number of rows is limited to 50. This is due to fact that probably no one will need that big of a metronome -- it's too distracting, and it may not be able to fit onto the screen (or if it does, may be too small to be legible in a performance setting).
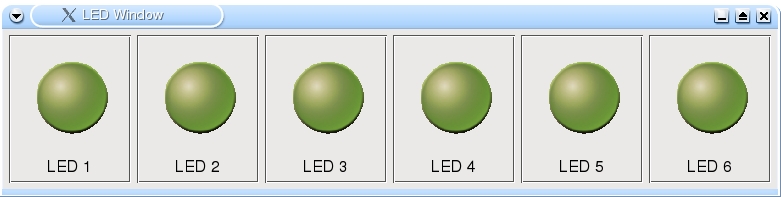
3.6.5 External LED Window
External LED window is simply a resizable set of 6 additional 3-stage LEDS (OFF, WARN, ON), each with the customizable name (see 3.5.4) that can be used in situations where additional visual stimuli are needed. External LED window is enabled via Settings' "general" tab (see 3.5.1).
<< | table of contents | >>